Installation
WebSphere Application Server installation Steps
1. Silent installation:
Installing IBM Installation Manager:
Go to the path where
you have downloaded the IBM IM Zip file
For e.g.
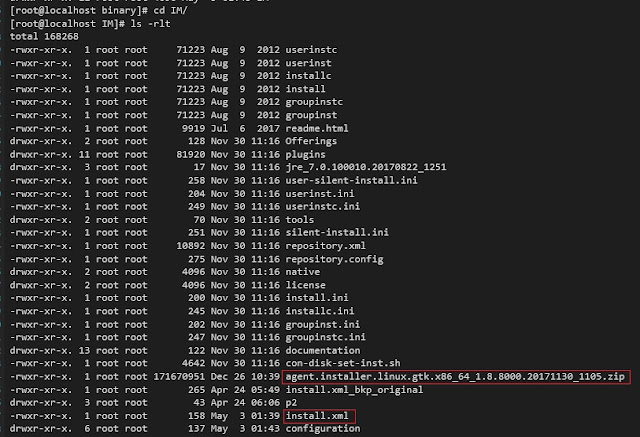
agent.installer.linux.gtk.x86_64_1.8.8000.20171130_1105.zip
unzip the file by using unzip command
unzip agent.installer.linux.gtk.x86_64_1.8.8000.20171130_1105.zip
Once extracted, you should see following

Now we will checked IM install.xml file
and open it
[root@localhost IM]# vi install.xml
=============================================
<?xml version="1.0" encoding="UTF-8"?>
<agent-input clean='true' temporary='true'>
<server>
<repository location='.'/>
</server>
<install>
<offering features='agent_core,agent_jre' id='com.ibm.cic.agent' version='1.8.8000.20171130_1105'/>
</install>
</agent-input>
=============================================
Now we will take the back-up of existing install.xml and edit original install.xml file with manual script(repository path and installation location, version)
==============================================
<?xml version="1.0" encoding="UTF-8"?>
<!--The "acceptLicense" attribute has been deprecated. Use "-acceptLicense" command line option to accept license agreements.-->
<agent-input acceptLicense='true'>
<server>
<repository location='/app/binary/IM'/>
</server>
<profile id='IBM Installation Manager' installLocation='/app/IBM/InstallationManager/eclipse' kind='self'>
<data key='eclipseLocation' value='/app/IBM/InstallationManager/eclipse'/>
<data key='user.import.profile' value='false'/>
</profile>
<install modify='false'>
<offering id='com.ibm.cic.agent' version='1.8.8000.20171130_1105' profile='IBM Installation Manager' features='agent_core,agent_jre' installFixes='none'/>
</install>
</agent-input>
===============================================
Installing IM :
We will execute below command and This will install IBM IM in the location
/app/IBM/InstallationManager.
./userinstc -acceptLicense --launcher.ini user-silent-install.ini -log /app/binary/IM/install.xml
/app/IBM/InstallationManager/eclipse/tools---> ./imcl -version
==============0==0==0===========================
WAS_ND installation:
After installing IBM IM, we will proceed
to install IBM WAS. We will first check the available packages / offerings in
the WAS Binaries which we have downloaded. We will refer those as repositories.
Go to Installation Manager installation directory and navigate to eclipse/tools directory
[root@localhost app]# cd /app/IBM/InstallationManager/eclipse/tools
And trigger below command.
[root@localhost app]# cd /app/IBM/InstallationManager/eclipse/tools
And trigger below command.
[root@localhost tools]# ./imcl listAvailablePackages -repositories /app/binary/WAS_ND
com.ibm.websphere.ND.v85_8.5.5000.20130514_1044
above is the package/offering ID
Now,
com.ibm.websphere.ND.v85_8.5.5000.20130514_1044
above is the package/offering ID
Now,
Go to Installation_Manager_path/eclipse/tools
directory and execute below command :
Syntax:
./imcl -s install <offering_id>
-repositories <WAS_Repository_path> -installationDirectory
<path_to_install_WAS> -acceptLicense -sP
e.g.
[root@localhost tools]#./imcl install com.ibm.websphere.ND.v85_8.5.5000.20130514_1044 -installationDirectory /app/IBM/WebSphere/AppServer -repositories /app/binary/WAS_ND -acceptLicense -showProgress
You will see the below message in screenshot as
Installed com.ibm.websphere.ND.v85_8.5.5000.20130514_1044 to the /app/IBM/WebSphere/AppServer directory.Go to /app/IBM/WebSphere/AppServer/bin directory
And execute the command : ./ versionInfo.sh
[root@localhost tools]# cd /app/IBM/WebSphere/AppServer/bin
[root@localhost bin]#
./versionInfo.sh


Comments
Post a Comment